- Home
- /
- Article

Thanks for your feedback.

Webex App | PagerDuty bot
 In this article
 Feedback?
PagerDuty helps teams all over the world proactively manage and respond to business-critical incidents. When connected to Webex App, users can automate incident management and come together to resolve issues even faster.
Add the PagerDuty bot to a Webex space
PagerDuty requires a manager, administrator, user, or owner role for linking a PagerDuty account with the bot. If you need help with this integration, contact devsupport@webex.com.
To add the PagerDuty bot to a Webex space:
- Go to Messaging and choose a space to which you’d like to add the
PagerDuty bot.
You can also create a new space with just the PagerDuty bot.
- Choose People, select Add People, and then
enter the PagerDuty bot email address:
PagerDuty02@webex.bot. - The bot responds with a card in the space. If you’re in a direct space with the bot,
send a
Himessage. - Select Link PagerDuty account and log in with your PagerDuty credentials.
- Choose or search for the service you want to connect to, then select Connect.
You can now create a new PagerDuty incident or manage notifications.
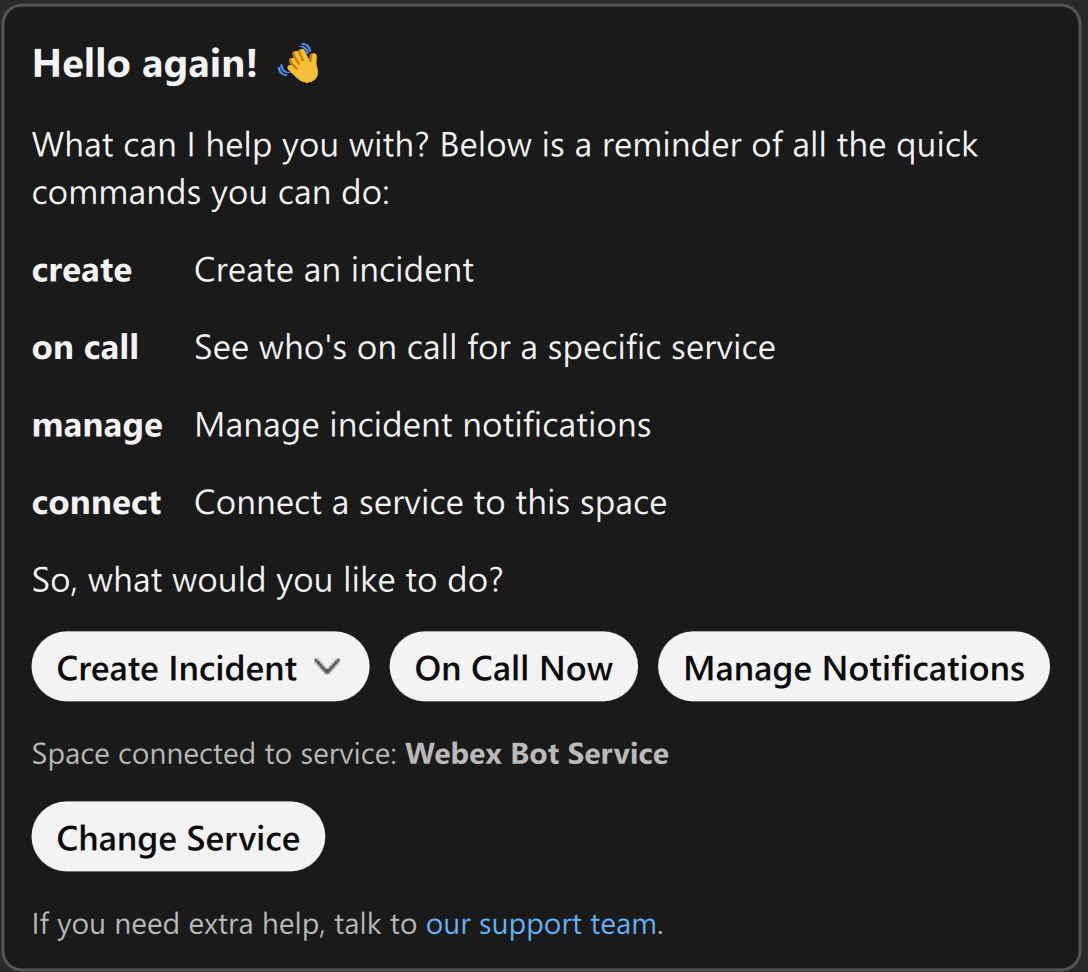
PagerDuty bot commands
There are several commands you can use to interact with the PagerDuty bot in Webex. To see
the complete list, enter help once you’ve linked your PagerDuty
account.
There are also some special commands available when the user is in a war room created by the bot.
See Manage incidents for configuring a war room.
Manage PagerDuty bot notifications
You can create new notifications or manage existing notifications for actions in PagerDuty, which trigger Webex App notifications.
To manage PagerDuty bot notifications:
- In the space containing the PagerDuty bot, enter
helpand send the message. - Select Manage Notifications or in the bot space, enter
manage, and send the message.You can also send a direct message
@PagerDuty Manageto manage notifications in group spaces. - Select the provided link to go to the PagerDuty notifications dashboard.
- From the dashboard you can:
- Edit existing notifications configured for any space where the PagerDuty bot is a member.
- Add new notification. Select Add new notification, then choose the notification type and service.
- The PagerDuty bot notifies users about the following events:
- Incident Triggered
- Incident Acknowledged
- Incident Escalated
- Incident Reassigned
- Incident Resolved
- Incident Unacknowledged Timeout
- Incident Escalation Policy Updated
- Incident Responders
You can register up to 10 different notifications for a service in PagerDuty.
- Authorization and an API Access Key enable the setup of multievent notifications.
- With Multi-Event Notification, users can configure a single webhook to handle multiple events during a notification setup.
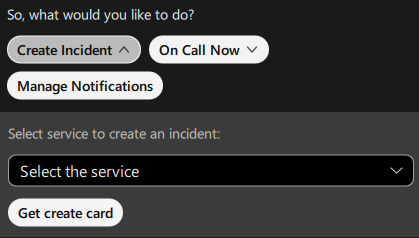
Create a new incident
To create and manage incidents from a Webex App space:
- In the bot space, enter
createand send the message.If you are in a group space, enter
@PagerDuty, select the PagerDuty Bot, and then enter your command. - If no service is connected, select a service and click Get create
card to create an incident.
- Complete the following fields in the Create new incident form and then select
Create.
- Title: Name of the incident and its resolution space.
- Description: More details about the incident.
- Urgency: The urgency of the incident, either high or low.
- Create a resolution space for this incident (optional): Add all users associated with the service to a new space. This creates a war room.
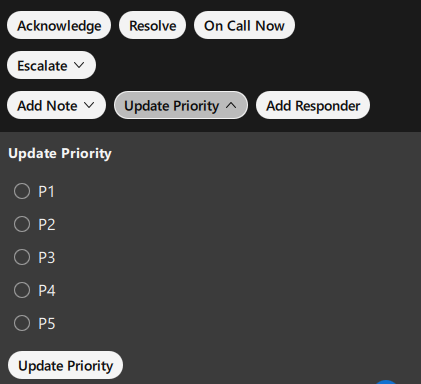
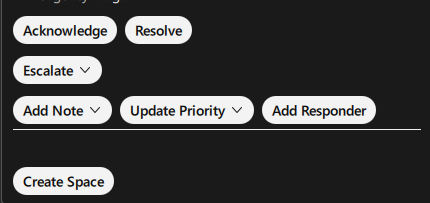
- The bot creates an incident card with the latest status of the incident. Use the buttons in the card to manage the status and add notes, add responders and update priority.
- The user can update or assign a priority to an incident using the Update
Priority button.
Clear PagerDuty service notifications
When creating a new notification, you might see an error message indicating that you’ve reached the PagerDuty service limit for integrations. To clear the error:
- Visit your PagerDuty Account Service Directory at
https://<your-account-url>.pagerduty.com/service-directory. - Locate your service in the search bar for which you want to create new notifications and select it. You might have to switch the Teams filter to All Teams.
- Navigate to the Integrations tab, scroll all the way to bottom and select Add or manage webhooks for this service.
- Delete any unnecessary webhooks to make room for more.
If you previously used the older Webex Bot ( PagerDuty.Bot@webex.bot) and need to clear its webhooks, look for endpoints that start with botworkflows.webex.com. These webhooks are related to the old bot and can be safely deleted.
Create a multi event notification
To add a multi event notification:
- When creating a new notification, the setup for multievent notifications appears with authorization and an API Access Key.
- Select Multi-Event Notifications, then you can choose any number of events to be notified within a single notification.
- You can select from the following list of events:
- Incident Triggered
- Incident Acknowledged
- Incident Escalated
- Incident Reassigned
- Incident Resolved
- Incident Unacknowledged Timeout
- Incident Escalation Policy Updated
- Incident Responders Added/Replied
You can't add a custom message in a multi event notification.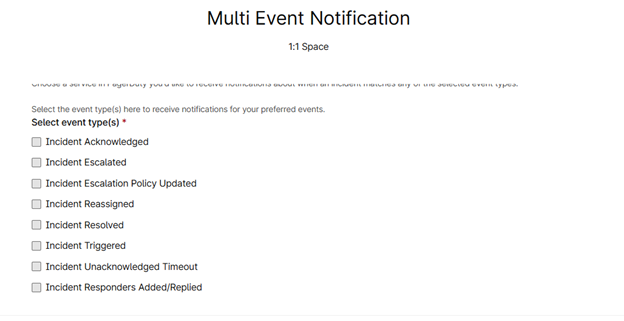
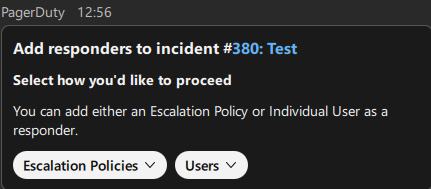
Add responders to the incident
To add responders to the incident:
- Create a new notification for the incident responders in the space. On the summary card,
click Add Responder.
- Choose an escalation policy or select individual users as responders. Add an optional
message for the responders, allowing them to accept or decline the request.
- After you send the request, responders receive a notification. The space where you made the request also gets a message.
- Responders sign in to their PagerDuty account at
https://<your-account-url>.pagerduty.comto accept or decline the invitation. Both the responder and the space receive a confirmation message showing if the invitation is accepted or declined. - If the request is from a group space, the responder is added to the group. If it’s from
a direct message, only a confirmation is sent.
In the war room, a webhook subscription for incident acknowledged, incident resolved, incident escalated, and incident responders added/replied events are created by default.
Add multiple services to a space
To add multiple services to a linked Webex space:
- Sign in to your PagerDuty account through the bot.
- After signing in, enter the
helpcommand.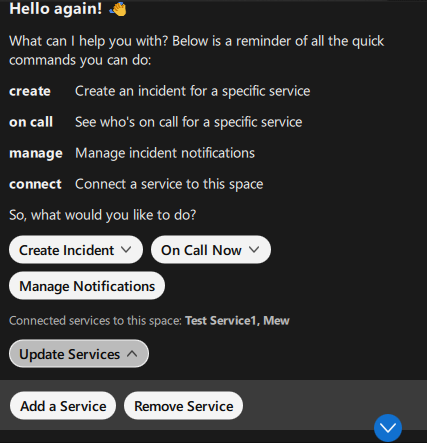
- Click Update Services on the card to add or remove a service.
- Click Add a Service. Select a service from the list. Repeat this
step to add more services (one at a time).
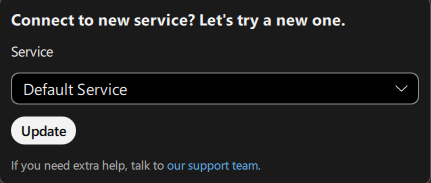
- If you’ve added multiple services, enter the
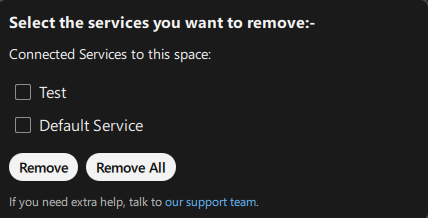
hicommand. You’ll then be able to choose which connected service to use when creating an incident. - Click Remove Service to remove one or all connected
services.